Aluminum channels can actually get rid of heat about five times quicker than those plastic ones out there on the market. This makes a big difference because it stops things from overheating and keeps LEDs working properly for way longer than usual, sometimes hitting that 50,000 hour mark or beyond. The special extrusion shape pairs really well with those polycarbonate diffusers we see so much these days, creating lighting that spreads evenly across kitchen surfaces without any harsh spots or annoying glare. What's interesting is how this better heat management cuts down on wasted electricity too. Tests show around 15% less energy going down the drain compared to regular LED strips without proper shielding. And let's face it, who doesn't want lights that stay bright while they're trying to chop veggies, measure ingredients, or read through complicated recipes?
Aluminum with powder coating stands up really well to kitchen grease, keeps moisture at bay, and handles everyday wear and tear without much effort needed beyond the occasional wipe down. The slim design sits almost flat against cabinets since they're barely over half an inch tall, hiding all those wires and hardware pieces so everything looks clean and simple. Most models come with built-in clips that make installation super easy - no tools required and each cabinet section takes less than ten minutes to put in place. For folks who want flexibility, there are magnetic versions that let them move things around whenever needed without reaching for any tools. But if stability is a bigger concern near appliances like dishwashers or fridges where vibrations happen often, going with the screw fixed option makes sense as it holds everything firmly in place despite constant movement.
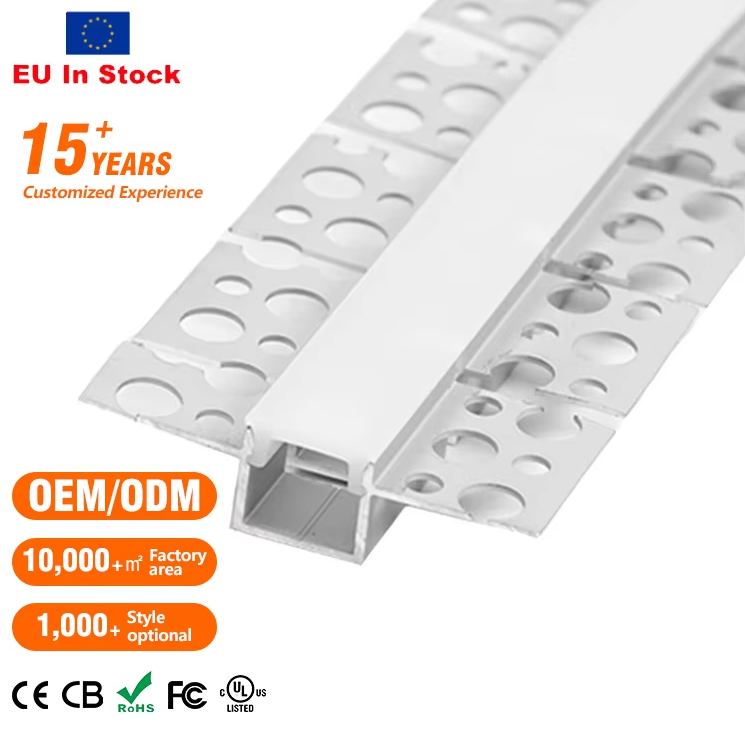
Choosing the right aluminum profile depends largely on what kind of cabinets we're dealing with, how much work needs doing, and what looks good to the eye. Surface mount profiles stick right onto the bottom of cabinets either with glue or screws. These are great when someone wants to retrofit old cabinets or install lighting on hard surfaces like granite countertops or ceramic tiles where making cuts just doesn't work out. For those who want something really sleek, recessed profiles need a small groove carved into the cabinetry or wall surface. The result is lighting that sits completely flat against the surface, creating those clean modern lines everyone loves these days. And then there are corner radiused profiles that bend nicely around those sharp 90 degree corners. They come in handy at those awkward L shaped spots between cabinets or can even draw attention to interesting architectural features in a room.
| Profile Type | Installation Method | Best For | Visual Impact |
|---|---|---|---|
| Surface-Mount | Adhesive/screws | Retrofit projects, stone surfaces | Visible, modern lines |
| Recessed | Channel cut into material | Flush integration, minimalist look | Nearly invisible |
| Corner-Radiused | Mounted on 90° edges | L-shaped cabinets, edge lighting | Accentuates contours |
Getting rid of heat is really important no matter what kind of lighting we're talking about. Aluminum conducts heat much better than plastic does, which means LEDs last about 30% longer when mounted on metal instead of plastic. When designing kitchens that need to look clean and sophisticated, recessed lights work wonders because they spread light evenly without drawing attention to themselves. Those corner radius designs are great at handling those tricky spaces where walls meet at odd angles, solving problems without looking out of place. Surface mount fixtures have become super popular among DIY enthusiasts since they're so easy to install. People love these for incremental improvements in their homes or when setting up temporary lighting solutions in rental properties where drilling holes isn't an option.
Getting that seamless look for under cabinet lighting really begins with smart cable handling. The best approach is running wires behind cabinet backs, through cornice areas, or inside those built-in raceways rather than letting them hang out where everyone can see them. This hides the mess and keeps the wiring safe from kitchen steam, liquid spills, and random bumps from pots or pans. When dealing with longer runs over about 5 meters, it makes sense to add power injection right in the middle of the circuit. According to some recent findings from the Illuminating Engineering Society's latest LED performance study, doing this cuts down on brightness loss by around 80% for these extended setups. And speaking of reliability, those pre-soldered connectors without any joints actually work better too. They seem to fail way less often than when someone tries to splice connections on site, probably cutting problems down somewhere around half compared to traditional methods.
Choose your mounting method based on substrate integrity, load requirements, and long-term adaptability:
Screw-mounted aluminum channels provide the highest structural integrity—supporting over 25 lbs per linear foot—making them the preferred choice for kitchens with frequent appliance vibration or heavy-duty usage.
Where we place those aluminum LED profile lights makes all the difference when it comes to how comfortable our eyes feel and staying safe while working in the kitchen. The best bet? Install those mounting channels somewhere between 2 to 4 inches back from the front of the cabinets so they light up the whole countertop area without leaving shadowy spots where we might cut ourselves. This matters a lot when doing things like chopping veggies, measuring out spices, or trying to read small text on ingredient labels. Inside each profile channel, go for LED strips packed with about 60 to 90 individual lights per meter length. That should give us roughly 500 to 800 lumens per foot of lighting strip, which falls right within what lighting experts recommend for getting good visibility during close-up kitchen work. Make sure there's even spacing between each light profile too, so no part of the counter gets left in darkness, especially near the sink area, stove top, and wherever most of our cutting happens. For the actual LED bulbs themselves, stick with 4000K neutral white ones. They strike just the right balance between showing true colors of food items and not making our eyes tired after hours of standing at the stove.